
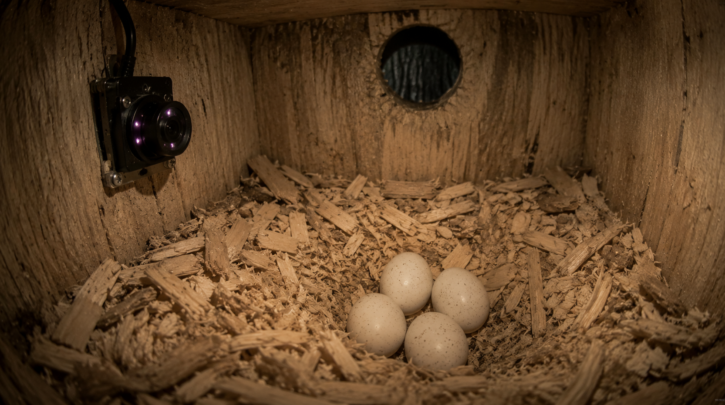

Once a woodpecker takes to a nest box — see our placement guide for getting to that point — the natural next step for a lot of hosts is wanting to actually see what’s happening inside. A woodpecker cavity is fully enclosed and dark, which rules out casual observation and makes camera choice more specific than it is for an open-cup nest you can simply watch from a distance.
Why Standard Trail Cameras Fall Short
Most trail cameras are built for outdoor wildlife at a distance — deer trails, game paths, yard perimeters — triggered by motion at several feet or more. A nest box interior is a completely different use case: near-total darkness, a subject often just inches from the lens, and a need for video or frequent stills rather than single motion-triggered shots. A generic trail camera mounted outside the box, aimed at the entrance hole, works reasonably well for activity logging, but doesn’t show what’s happening inside the cavity itself.
Two Approaches: External vs. Internal
External entrance-monitoring cameras
A standard trail camera mounted a few feet from the box, aimed at the entrance hole, tracks adult visits, feeding frequency, and fledging day without any invasive installation. This is the simpler, lower-risk option and works with off-the-shelf trail camera hardware.
Internal cavity cameras
Purpose-built nest box cameras — small, low-light or infrared-capable lens modules wired through the box wall or roof — show the actual interior: eggs, incubation behavior, hatching, and chick development covered in our fledging guide. These require installing the camera before or very early in the nesting attempt, since disturbing an active nest to retrofit a camera risks abandonment.
| Feature | Why It Matters for a Nest Box |
|---|---|
| Infrared/low-light capability | Cavity interiors are dark even during the day |
| Wide-angle lens | Box interiors are small; a narrow field of view misses activity |
| Wired or long-battery-life power | Frequent triggers over weeks drain standard trail camera batteries fast |
| Weatherproof housing | External units face full outdoor exposure for the entire season |
| Fast trigger speed | Adults enter and exit quickly, especially during peak feeding |
Installation Timing
Internal cameras should go in during box construction or during the off-season before any nesting activity begins — ideally by late winter, ahead of the spring pairing and cavity-selection period covered in our spring behavior guide. Installing or adjusting a camera once a pair has already begun excavating or has eggs present risks nest abandonment and should be avoided.
Power and Connectivity
Wired setups running to a nearby power source and a recording device (or wireless transmission to an indoor receiver) avoid the battery-life problem that plagues battery-powered units under continuous or near-continuous recording. For a box mounted far from any structure, a solar-powered unit paired with a low-power infrared camera is the more practical compromise, though it typically costs more upfront than a wired system.
What to Skip
- Standard consumer trail cameras with no low-light/infrared mode for interior use
- Any installation that requires opening or modifying an already-occupied box
- Cameras with audible shutter or focus motors that could disturb incubating adults
Storage and Footage Management
Continuous recording over a full nesting season — roughly a month of incubation and brooding covered in our eggs guide and fledging guide combined — generates a substantial amount of footage if left running constantly. Motion-triggered recording rather than continuous video cuts storage needs dramatically while still capturing every visit, feeding, and activity change worth reviewing. Cloud-connected units add convenience for remote viewing but depend on a stable wireless signal reaching the box location, which isn’t always practical for a nest box mounted well away from a house or other structure.
Respecting the Nest
Whatever setup you choose, minimizing disturbance stays the priority throughout. Avoid checking or adjusting camera equipment during the incubation period itself, and resist the temptation to open the box for a closer look once eggs or chicks are present — the camera exists specifically so that kind of direct disturbance isn’t necessary. A well-installed camera should let you follow the entire nesting cycle without a single additional visit to the box after the season begins.
Budget Considerations
A basic external trail camera aimed at the entrance hole is the far more affordable starting point, typically costing a fraction of a dedicated internal cavity camera system with wiring and a low-light sensor module. For most backyard hosts primarily interested in confirming activity, feeding frequency, and fledging timing rather than watching the full interior experience, external monitoring delivers most of the practical value at a much lower cost and with far less installation complexity.
Legal and Ethical Considerations
Woodpeckers, like nearly all native North American bird species, are protected under the Migratory Bird Treaty Act, which covers disturbance of active nests. Installing or adjusting camera equipment on an already-active nest — rather than during the off-season before eggs are present — can constitute exactly this kind of disturbance and should be avoided both for the bird’s welfare and to stay within the bounds of that protection. Planning camera installation well ahead of the breeding season, covered in our spring behavior guide, avoids this issue entirely.
Sharing Footage Responsibly
If you plan to share nest camera footage publicly, avoid disclosing the exact property location, since a documented active nest site can attract unwanted attention or disturbance from people hoping to see it in person. General regional information is usually enough context for viewers without creating a specific risk to the nest itself. This same principle applies to sharing exact coordinates or precise addresses in any online birding community, not just camera footage specifically.
Getting Started
For a first attempt at nest monitoring, starting with the simpler external entrance-camera setup is the more forgiving option — it requires no modification to the box itself, works with widely available consumer trail camera hardware, and still delivers the core information most hosts actually want: confirmation of occupancy, feeding frequency, and eventual fledging date. An internal camera can always be added on a future box once the external setup has proven the site is worth the added investment.
B&H Photo carries both standard trail cameras for entrance monitoring and dedicated low-light nest box camera modules for interior installation, depending on which approach fits your setup.